
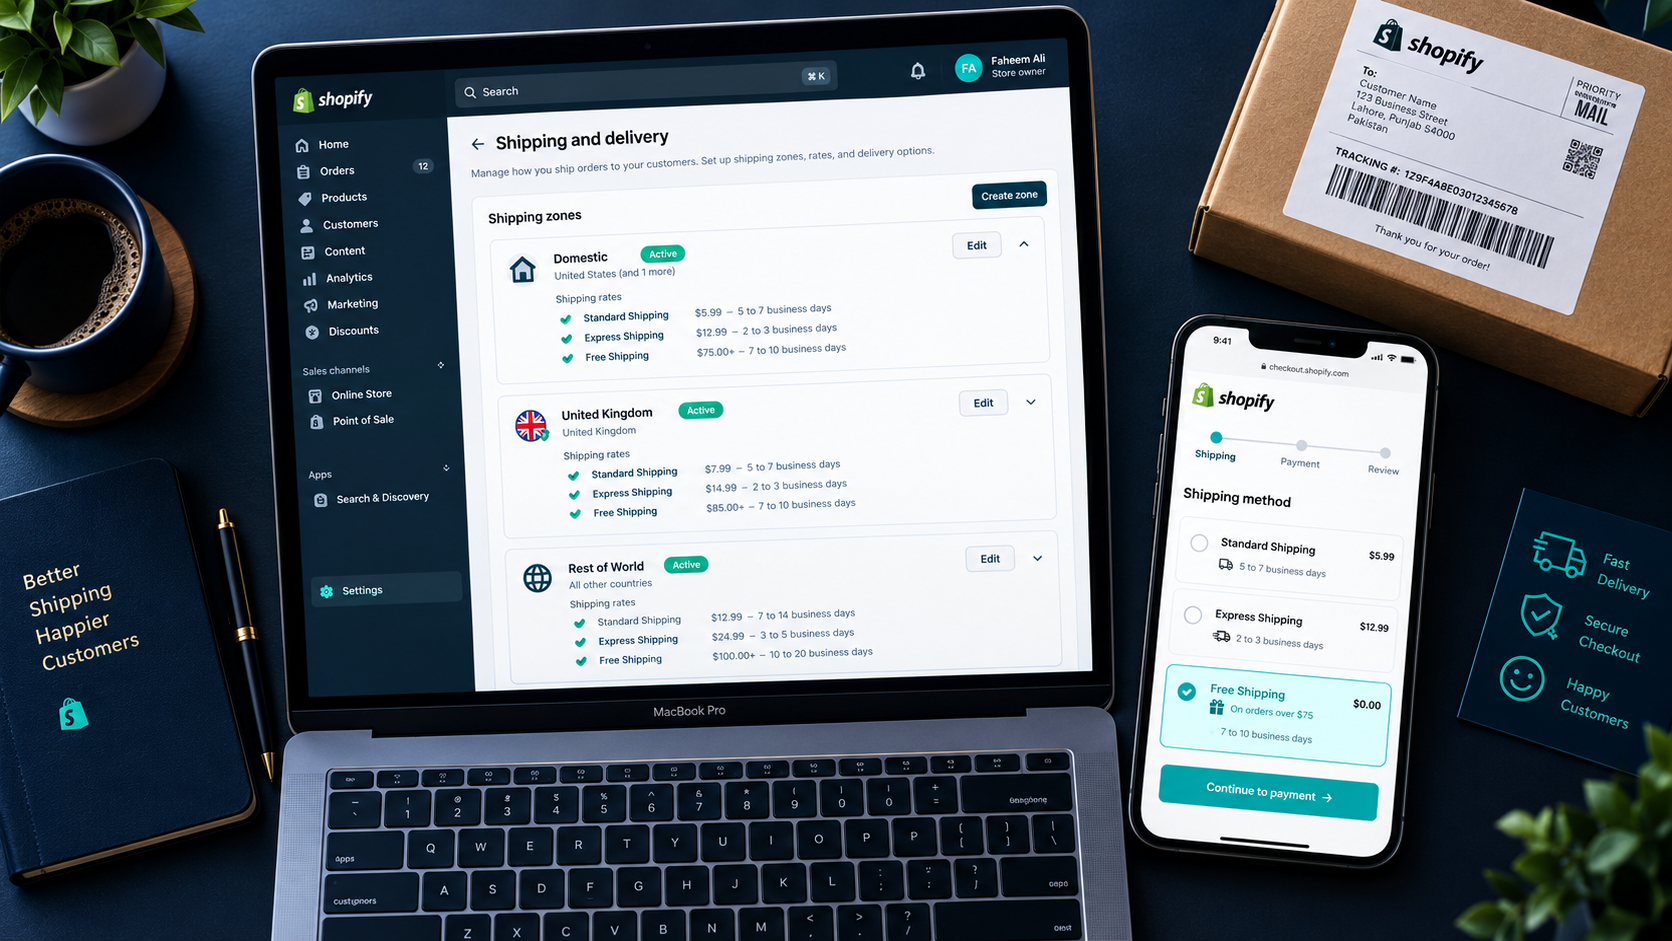
Set Up Shopify Shipping Rates, Zones, and Free Shipping
Shipping configuration is the most commonly misconfigured part of any Shopify store — and the consequences show up directly in your checkout abandonment rate and your profit margin simultaneously. Set Up Shopify Shipping Rates, Zones, and Free Shipping
Unexpected shipping costs are the number one reason shoppers abandon their carts. 48% of consumers cite extra fees at checkout — primarily shipping — as the top reason they leave without buying. That means your shipping setup is not a back-office administrative task. It is a conversion rate decision that affects every single visitor who reaches your checkout.
At the same time, getting shipping wrong in the other direction — offering free shipping without calculating the margin impact, or setting flat rates that do not cover your actual carrier costs for heavy or oversized orders — destroys the profitability of every order those rates apply to. A store that converts well but ships at a loss is not a business. It is a cash drain with a good user experience.
This guide covers the complete Shopify shipping setup from the foundational concepts through the specific steps to configure zones, rates, and free shipping thresholds that both convert visitors and protect your margins.
Understanding Shopify's Shipping Architecture Before You Configure Anything
The single reason most merchants misconfigure Shopify shipping is that they open Settings and start clicking without understanding the structure they are working within. Taking five minutes to understand how Shopify's shipping system is organized saves hours of troubleshooting later.
Shopify's shipping operates through three nested layers: Shipping Profiles contain Shipping Zones which contain Shipping Rates. Understanding what each layer does and how they relate to each other makes the entire configuration process logical rather than confusing.
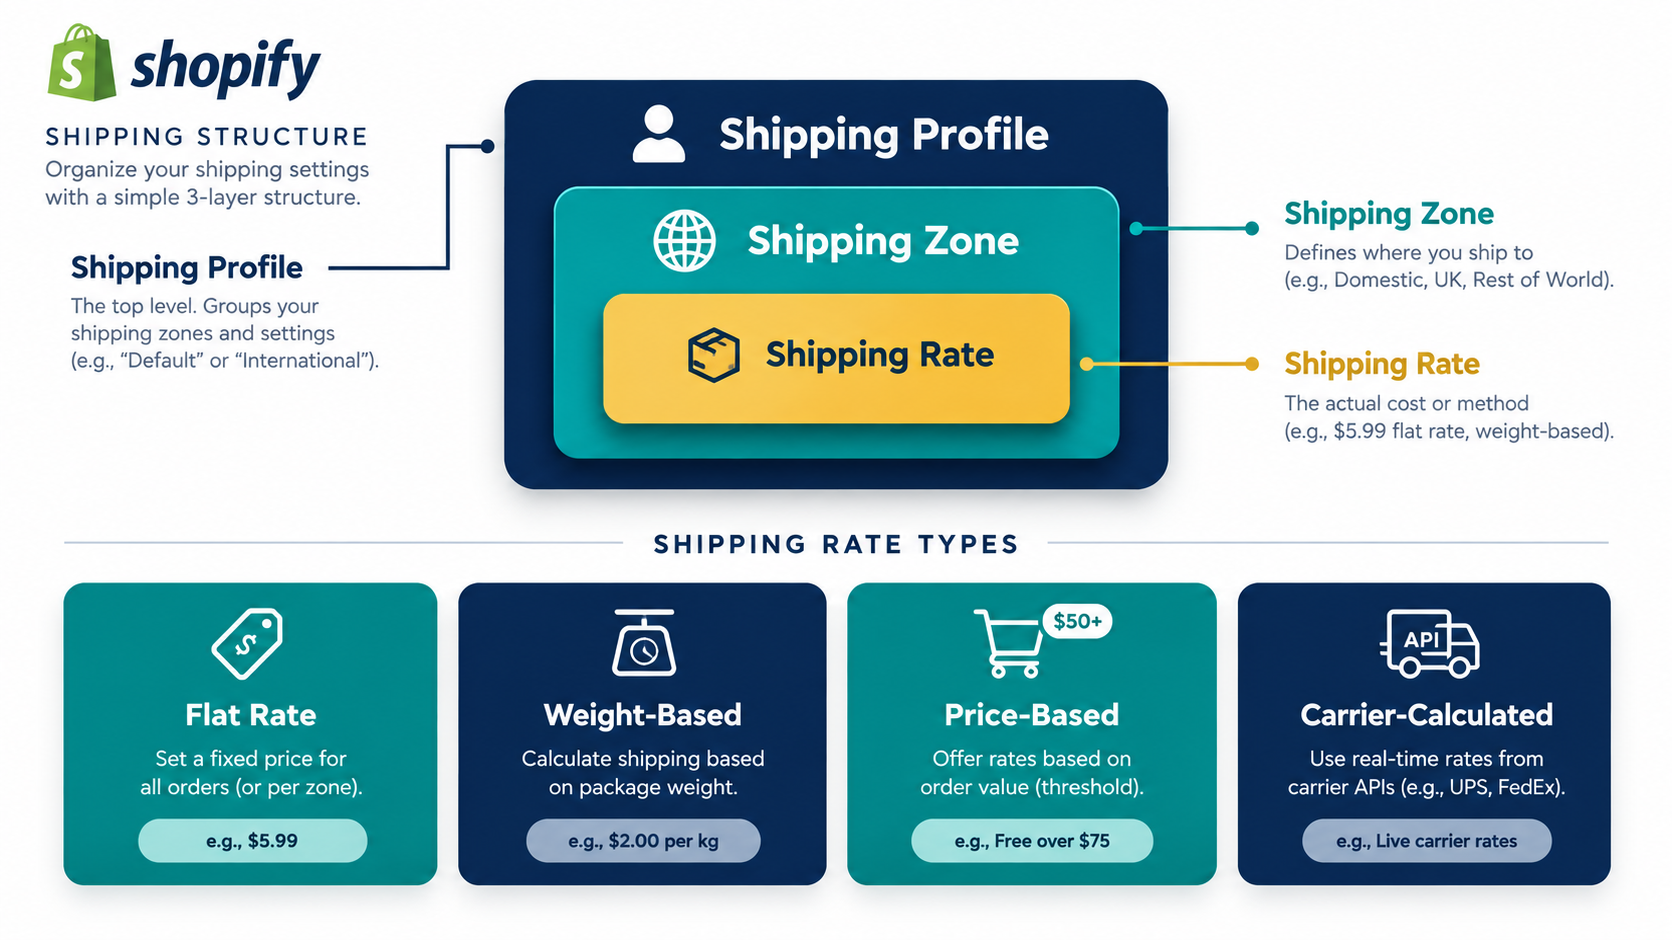
A Shipping Profile is a container that links specific products to specific shipping rules. Every Shopify store has a General Shipping Profile by default — this applies to all products that are not assigned to a custom profile. Custom profiles allow you to apply different shipping rules to specific products — for example, a profile for heavy furniture that uses weight-based carrier-calculated rates, separate from a profile for lightweight accessories that uses flat rates.
A Shipping Zone is a geographic grouping within a profile — Domestic, Canada, European Union, Rest of World, and so on. Each zone you create contains the countries or regions where you ship to, and you set independent rates for each zone. You can have up to 20 zones per shipping profile.
A Shipping Rate is the specific delivery option and cost a customer sees at checkout within a given zone. A zone can contain multiple rates — for example, a Standard Shipping rate at $5.99, an Express Shipping rate at $12.99, and a Free Shipping rate that activates above a minimum order value. Each rate can be flat price, weight-based, price-based, or carrier-calculated.
Knowing this architecture means that when you configure shipping, you always follow the same logical sequence: profile first, zones second, rates third. Working in any other order creates gaps that cause checkout errors or missing shipping options.
Step 1: Set Your Shipping Origin Address
Before configuring any zones or rates, your shipping origin address must be accurate. Shopify uses this address to calculate carrier-calculated shipping rates and to generate shipping labels. An incorrect origin address produces inaccurate rate calculations that either overcharge customers — which hurts conversion — or undercharge you — which hurts margin.
Navigate to Settings then Shipping and Delivery in your Shopify admin. Under Shipping Origin, click Edit and confirm your full, accurate business address including the correct postal code and country. If you fulfill from multiple locations — a warehouse, a 3PL, and a home office, for example — add each location under Settings then Locations and then assign each location to the appropriate shipping profile.
This step takes two minutes and is frequently skipped by merchants who jump straight to rate configuration. Do not skip it.
Step 2: Configure Your Shipping Profiles
For most Shopify stores launching with a single product type and similar product weights, the General Shipping Profile handles everything. You do not need custom profiles until your product catalog includes items that genuinely require different shipping rules from each other.
To access the General Profile, go to Settings then Shipping and Delivery and click Manage under General Shipping Rates. This is where you will configure all zones and rates for your standard product lineup.
Create custom profiles when your catalog includes physical and digital products simultaneously — digital products need a profile with no shipping zones since they do not ship; large or heavy items that require freight shipping or carrier-calculated rates rather than the flat rates appropriate for lighter items; products you want to offer with free shipping that do not apply to your entire catalog; and items sold exclusively to specific geographic markets.
To create a custom profile, scroll to the Custom Shipping Rates section in Settings then Shipping and Delivery, click Create New Profile, name the profile clearly, and add the specific products it applies to. Then configure zones and rates for that profile following the same steps as the General Profile.
Step 3: Create Your Shipping Zones
With your profile ready, the next step is defining the geographic areas you ship to and grouping them into zones that share the same rate structure.
Inside your shipping profile, click Add Shipping Zone. Name the zone clearly — Domestic, Continental US, Canada, Europe, or Rest of World — and then add the countries or regions it covers.
For a US-based store starting with domestic and a few international markets, a practical starting zone structure is:
Zone 1 — Domestic (Continental US): the 48 contiguous states. If you want Alaska and Hawaii to have different rates — which is common because shipping costs are significantly higher — uncheck those two states from this zone and create a separate Alaska and Hawaii zone with appropriate higher rates.
Zone 2 — Canada: a separate zone for Canadian orders which typically carry higher shipping costs than domestic and have different carrier options.
Zone 3 — United Kingdom: if you sell into the UK market, UK post-Brexit import rules make it worth a dedicated zone separate from the broader European market.
Zone 4 — European Union: the combined EU market, which shares trade rules and carrier options.
Zone 5 — Rest of World: a catch-all zone for all remaining countries you ship to, typically with your highest flat rate or a carrier-calculated rate.
For stores in Pakistan selling internationally — a common configuration for EcomFixify's audience — the zone structure typically starts with a Rest of World zone covering your primary international markets (US, UK, UAE, Australia) and expands to country-specific zones as volume in individual markets grows and dedicated rates become worth configuring.
You do not need to include every country in a zone. Countries not assigned to any zone simply cannot be selected at checkout — which effectively prevents orders from those destinations without generating confusing error messages. Only create zones for markets you are genuinely set up to fulfill to.
Step 4: Add Shipping Rates to Each Zone
With zones created, add at least one rate to each zone. A zone with no rate means customers in that region reach checkout with no shipping option available — which produces an error that prevents them from completing their order.
Shopify supports four types of shipping rates. Understanding when to use each prevents the margin miscalculations that make shipping a profitability drain.
Flat Rate Shipping
A flat rate charges every customer in the zone the same amount regardless of order size or weight. This is the simplest rate to configure and the right starting point for most Shopify stores whose products have relatively consistent weight and dimensions.
For a domestic US zone, starting flat rates in 2026 fall between $4.99 and $7.99 for standard delivery and $12.99 to $15.99 for expedited delivery. These figures reflect typical carrier costs for lightweight to medium-weight parcels at standard commercial rates.
The risk with flat rates is that they work well for your average order but can undercharge significantly on heavy orders or overcharge on light ones. If your product catalog has highly variable weights — from 100g accessories to 5kg equipment — weight-based rates are more accurate.
To add a flat rate, click Add Rate inside your zone, name the rate, enter the price, add an optional estimated delivery time, and click Done.
Weight-Based Rates
Weight-based rates charge different amounts depending on the total weight of the order. These are more accurate than flat rates for stores with variable product weights but require that you enter accurate weights on every product in your Shopify catalog.
Before setting up weight-based rates, go through your entire product catalog and enter accurate weights in the Shipping section of each product listing. Rates calculated against incorrect or missing weights produce inaccurate charges that either surprise customers at checkout or cost you money on every order.
A common weight-based structure for a domestic US zone: orders under 0.5 kg at $3.99, orders from 0.5 to 2 kg at $6.99, orders from 2 to 5 kg at $9.99, and orders above 5 kg at carrier-calculated rates. Adjust these thresholds and prices based on your actual carrier quotes for each weight range.
Price-Based Rates
Price-based rates charge different amounts depending on the total order value — and they are the mechanism behind free shipping thresholds, which is the most commercially important rate type for most Shopify stores.
A price-based rate structure typically looks like this: orders from $0 to $49.99 pay a standard shipping fee, and orders from $50 and above pay $0 — free shipping. The free shipping threshold is configured within a single rate using the minimum and maximum order value conditions, not as two separate rates.
Carrier-Calculated Rates
Carrier-calculated rates pull real-time pricing directly from shipping carrier APIs — DHL, FedEx, UPS, Royal Mail, and others — and display the actual cost to ship a specific order to a specific address at checkout. They are the most accurate rate type because they reflect actual carrier pricing rather than your estimate of it.
Carrier-calculated rates require that your products have accurate weights and dimensions entered in Shopify. They also require a carrier account connected to Shopify, or using Shopify Shipping which provides pre-negotiated rates with major carriers at discounts of up to 88% off retail rates.
These rates work best for international shipping where the cost varies significantly by destination, and for heavy or oversized domestic items where flat rates consistently undercharge and erode margin.
Step 5: Set Up Your Free Shipping Threshold — The Conversion and AOV Strategy
Free shipping is not purely a customer benefit decision. It is a conversion tool and an average order value lever when configured correctly — and a margin drain when configured carelessly.
66% of online shoppers expect free shipping on every order. Free shipping increases conversion rates by 10 to 20% compared to stores charging for all shipping. And 81% of shoppers are willing to spend more to reach a free shipping threshold — which is the strategic core of threshold-based free shipping.
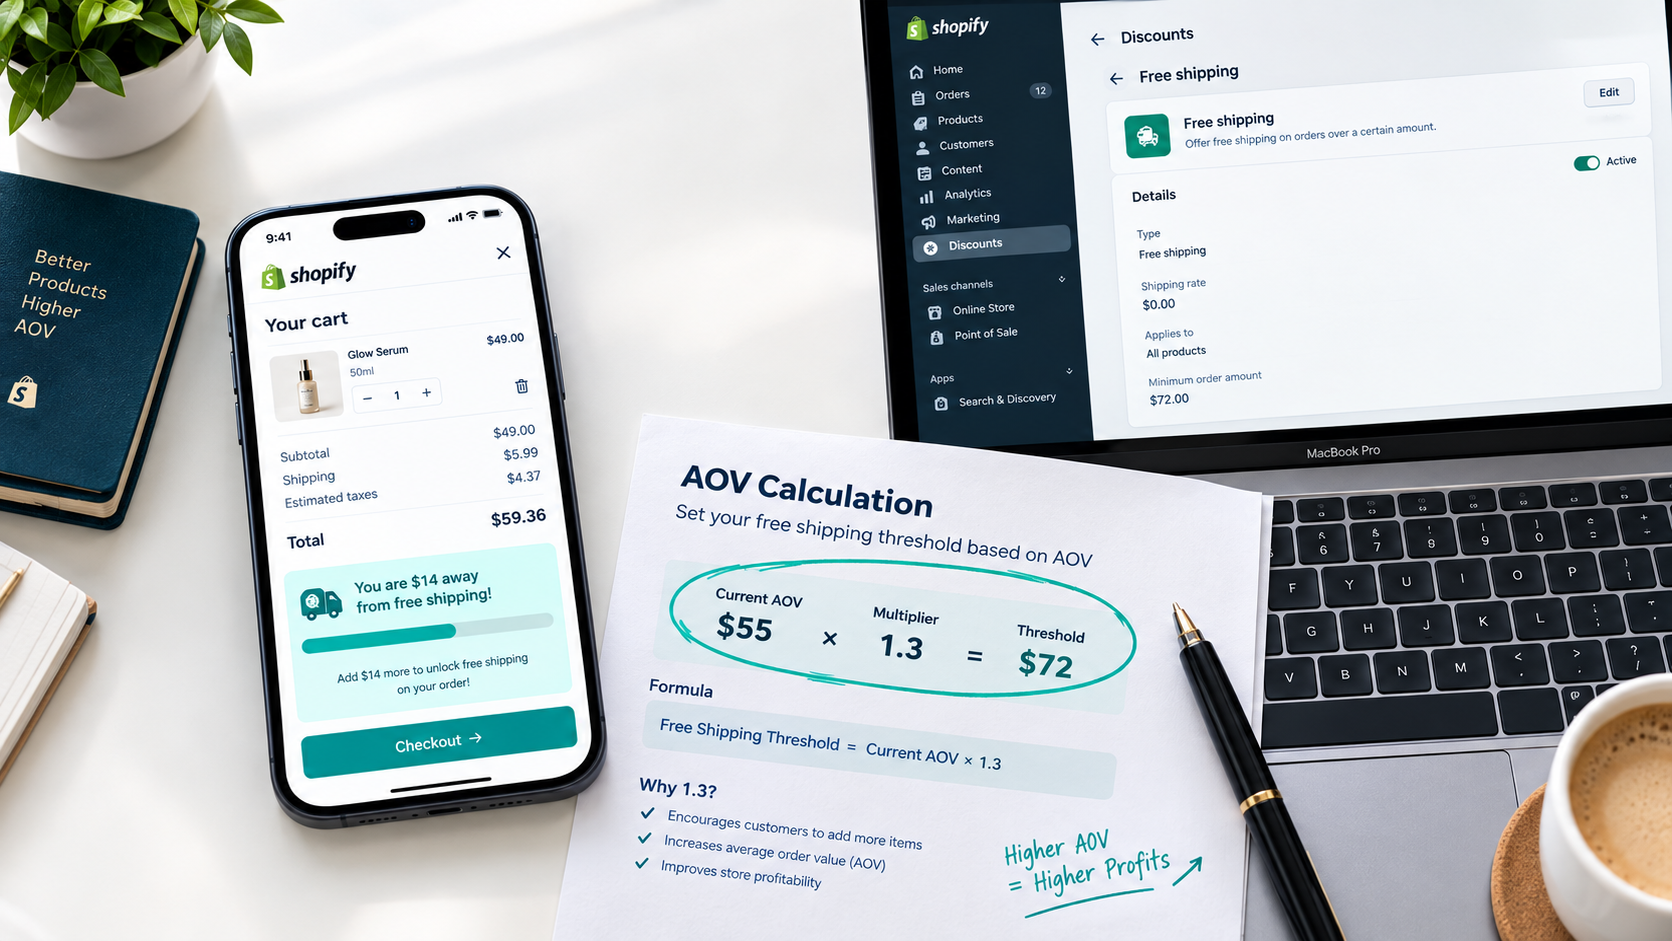
The formula for setting your free shipping threshold correctly is to set it 20 to 30% above your current average order value. If your AOV is $50, your free shipping threshold should be $65 to $75. This positioning converts customers who are close to the threshold into higher-value orders through the addition of one more item — while customers who are well above the threshold qualify automatically without needing to change their behavior.
Setting the threshold too close to your AOV means most customers already qualify without spending more — you capture the conversion benefit of free shipping without capturing the AOV lift. Setting it too far above your AOV means customers who cannot reasonably reach it ignore it entirely rather than adding items to qualify.
To configure a free shipping threshold in Shopify: inside your zone, click Add Rate, name it Free Shipping, set the price to $0.00, click Add Conditions, select Based on Order Price, set the minimum order value to your threshold amount, leave the maximum order value blank so it applies to all orders above the threshold, and click Done then Save.
This creates a price-based rate that charges $0 for all orders above your threshold value within that zone. For orders below the threshold, your standard paid rates apply.
Step 6: Display Your Free Shipping Threshold Across Your Store
Configuring the free shipping threshold in your shipping settings is only half the strategy. The threshold only lifts AOV if customers know about it — and a threshold hidden until checkout has no behavioral effect on cart building.
The free shipping progress bar is the most effective implementation. It displays on the cart page, the cart drawer, and ideally the product page, showing customers how much more they need to spend to qualify — "You are $14 away from free shipping." This real-time prompt consistently increases cart value because it gives customers a specific, achievable target to reach before checking out.
Free shipping progress bar apps including EA Free Shipping Bar and Hextom Free Shipping Bar integrate with Shopify natively and display the threshold progress dynamically based on each customer's current cart value. Both have free tiers that cover the core functionality for stores at early to mid scale.
Beyond the cart bar, mention your free shipping threshold in your homepage hero section, on product pages near the Add to Cart button, in your email welcome series for new subscribers, and in your abandoned cart recovery emails. The more touchpoints at which customers encounter the threshold before reaching checkout, the higher the percentage who adjust their cart to reach it.
Step 7: Configure International Shipping Rates
International shipping configuration involves additional considerations beyond simple rate setting — primarily duties and taxes, which when handled incorrectly create the most common negative international customer experience in ecommerce.
For each international zone you create, the same rate type options apply — flat rate, weight-based, price-based, or carrier-calculated. For most international markets, carrier-calculated rates are the most accurate because international shipping costs vary significantly by destination country, package weight, and declared value.
If you use Shopify Payments and are selling into markets covered by Shopify Markets, enable the duty and tax collection features that collect estimated import fees at checkout. This moves your international shipments from Delivered Duties Unpaid — where customers pay surprise customs fees at delivery — to Delivered Duties Paid, where the total cost is visible and agreed at checkout.
For Pakistani merchants shipping to UK, UAE, and Australian markets: these three destinations have different duty thresholds and import tax structures. The UAE has no import tax on orders below AED 1,000 (approximately USD 272). The UK charges 20% VAT on all commercial imports. Australia charges GST on goods above AUD 1,000. Knowing these thresholds helps you price your products and shipping rates to minimize the landed cost that reaches your international customers.
If you ship internationally but do not yet want to configure carrier-calculated rates, a practical starting point is a flat rate set high enough to cover your actual carrier costs for the heaviest product in your catalog — this prevents undercharging on heavy orders while remaining simple to configure.
Step 8: Test Your Shipping Setup Before Going Live
No shipping configuration should go live without thorough testing. Shipping errors — missing rates that prevent checkout, incorrect rates that overcharge customers, or free shipping thresholds that do not activate correctly — create checkout abandonment that is difficult to diagnose from analytics alone.
The testing protocol that catches the most errors before launch covers five scenarios: place a test order from a domestic address and confirm the rate options appear correctly and the free shipping threshold activates at the right order value; place a test order from an international address to confirm international rates appear and duties are handled correctly; place a test order with a product from each custom shipping profile to confirm profile-specific rates are applying to the right products; test a cart value just below your free shipping threshold to confirm the standard rate applies; and test a cart value just above your threshold to confirm free shipping activates.
Place these test orders using Shopify's test payment gateway — available in your payment settings under Bogus Gateway — so you can go through the complete checkout flow without processing real charges. Review the shipping options at each checkout step and confirm they match your configuration.
If you find errors, the most common causes are products not assigned to the correct shipping profile, incorrect country assignments within zones, threshold conditions set with maximum order values that cut off before expected, and product weights missing or entered incorrectly for weight-based rates.
The Free Shipping Discount Code Method — An Alternative Approach
Beyond threshold-based rates in your shipping settings, Shopify allows you to create free shipping discount codes — promotional codes customers enter at checkout that remove shipping costs regardless of their cart value.
To create a free shipping discount code: go to Discounts in your Shopify admin, click Create Discount, select Free Shipping, name your code, set any applicable conditions — minimum purchase amount, specific customer segments, usage limits — and save.
Free shipping discount codes are most useful for promotional campaigns, email subscriber offers, and influencer partnerships where you want to provide free shipping as an incentive to a specific audience without changing your baseline shipping rates for all customers. The code approach lets you run time-limited free shipping promotions and track how many orders use the code — which the standard threshold rate configuration does not provide.
For standard store operations, the threshold-based rate in shipping settings is cleaner. For targeted promotions, the discount code approach gives you flexibility and measurement capability the rate approach cannot match.
Common Shopify Shipping Configuration Mistakes to Avoid
Hiding the free shipping threshold until checkout. A customer who does not know about your threshold before they reach the cart has no opportunity to add items to qualify. Display it on product pages and in the cart drawer — not just at checkout where the decision to add more items is already too late.
Using a single flat rate for international markets. A flat rate set to cover a heavy order to Australia will dramatically overcharge a light order to Canada. Differentiate rates by region and by weight for international markets to avoid both overcharging customers and undercharging yourself on heavy international orders.
Forgetting to add rates to all zones. A zone with no rate means customers in that zone cannot complete checkout. After creating any new zone, immediately add at least one rate — even a temporary placeholder — to prevent checkout errors for customers in that region.
Not updating shipping profiles when adding new products. When a new product is added to your catalog, it is automatically assigned to the General Profile. If the new product requires different shipping rules — it is heavier, larger, or qualifies for free shipping when other products do not — you must manually move it to the appropriate custom profile. Products accumulating in the wrong profile are a frequent source of incorrect shipping charges.
Setting a free shipping threshold without a progress bar. The threshold in your settings creates the discount mechanics. The progress bar creates the behavioral nudge that actually converts browsers into higher-value buyers. One without the other is half a strategy.
Shopify Shipping Apps Worth Adding
For stores whose shipping complexity exceeds what Shopify's native configuration handles smoothly, several apps extend the platform's capability in specific directions.
Shipstation connects Shopify to all major carrier networks — UPS, FedEx, DHL, USPS, Royal Mail, and Australia Post — with discounted rates and automated label generation. It is the most widely used multi-carrier shipping management app for Shopify and is particularly valuable for stores with significant order volume or complex multi-carrier requirements.
ShipBob is a 3PL fulfillment network with warehouse locations across the US, UK, EU, Canada, and Australia. For Shopify merchants who have outgrown self-fulfillment, ShipBob manages inventory storage, order picking, packing, and carrier dispatch — integrating directly with Shopify so orders route to ShipBob automatically without manual intervention.
Easyship provides access to 250 plus courier services globally with real-time rate comparison at checkout — showing customers three to five shipping options with different speed and price combinations. For international-focused Shopify stores where carrier choice meaningfully affects customer experience, Easyship's rate display system gives customers the transparency they increasingly expect.
EA Free Shipping Bar — mentioned earlier — is the essential companion to your free shipping threshold. The free plan covers the core progress bar functionality for most stores and requires no configuration beyond entering your threshold value and choosing your display placement.
A Practical Shipping Rate Starting Point for New Shopify Stores
For a new Shopify store that does not yet have enough order history to calculate a data-informed AOV or carrier cost baseline, this starting configuration covers the majority of use cases without requiring complex setup:
Domestic zone: Standard Shipping at $5.99 flat rate covering all domestic orders, Express Shipping at $12.99 flat rate for expedited delivery, and Free Shipping at $0 for orders above $75.
International zone — major English-speaking markets: Standard International Shipping at $12.99 flat rate. This rate is intentionally conservative to avoid undercharging on heavier domestic equivalents shipped internationally.
Rest of World zone: Standard International at $18.99 flat rate or carrier-calculated if your carrier account allows it.
This starting configuration is not permanent — it should be reviewed at 90 days with your actual order data in hand. Once you have 50 or more orders with known shipping costs, you can calculate whether your flat rates are covering costs accurately and adjust accordingly.
Final Thoughts
Shopify shipping configuration is one of those foundational tasks that most merchants want to finish once and never touch again — but it is also one that has a measurable ongoing impact on every customer who reaches your checkout.
The merchants with the best shipping setups in 2026 treat configuration as a periodic review process rather than a one-time setup task. They check their rates quarterly against actual carrier costs, update their free shipping threshold as their AOV grows, add country-specific zones as new markets gain traction, and monitor checkout abandonment rates for spikes that indicate a shipping configuration problem.
The system described in this guide — accurate origin address, logical zone structure, rate types matched to product characteristics, a free shipping threshold set at 1.3 to 1.5 times your AOV, and a progress bar making that threshold visible throughout the store — covers the configuration decisions that most directly affect both conversion and margin.
Set it up correctly the first time. Test it thoroughly before launching. Review it quarterly as your business grows. Shipping will never be the most exciting part of running a Shopify store — but getting it right means every order that converts also ships profitably.
Need help configuring your Shopify shipping setup, or want an expert to audit your current rates and zones for conversion and margin gaps? Get in touch with EcomFixify — we specialize in Shopify development and store optimization for growing brands.