
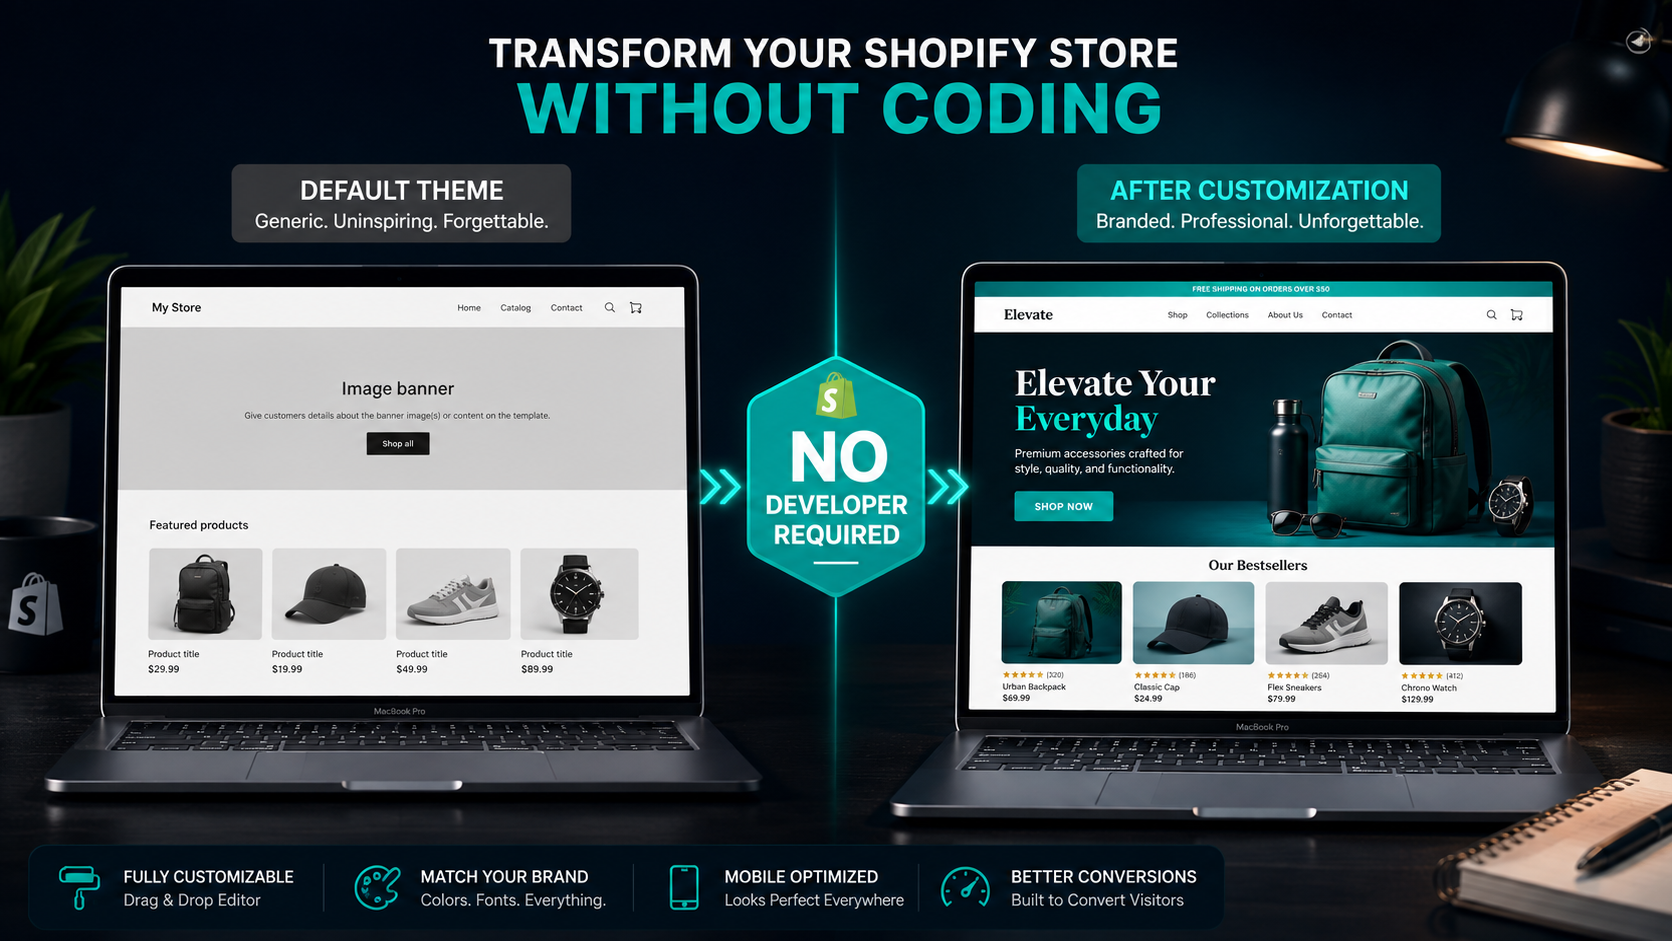
How to Make Your Store Theme Look Unique Without a Developer
Walk through the Shopify Theme Store and you will notice something almost immediately. Every theme demo looks polished, distinctive, and professional. Install that same theme on your store and strip out the placeholder content — and suddenly it looks exactly like every other Shopify store running the same template. How to Make Your Store Theme Look Unique Without a Developer
That is not a design failure. It is the default state of every theme before deliberate customization. And it is the reason why thousands of Shopify stores that sell genuinely good products feel forgettable — not because the merchant could not afford a great developer, but because they installed a theme, added their products, and called it done.
In 2026, there is no reason to stop there. Shopify's Online Store 2.0 architecture, the visual theme editor, the AI Block Generator, the Horizon theme framework, and an ecosystem of no-code app blocks give merchants tools powerful enough to build stores that rival professionally designed agency work — without writing a single line of code. No-code customization saves between $500 and $2,000 per customization project compared to hiring a developer for the same output.
This guide covers every meaningful theme customization available to Shopify merchants in 2026 without touching code — and the specific changes that most directly impact brand perception, trust, and conversion rate.
Why Theme Customization Is a Revenue Decision, Not Just a Design Decision
The temptation is to frame theme customization as an aesthetic preference — a question of whether your store looks nice. The commercial reality is more direct than that.
A customized, visually coherent store signals professionalism, competence, and trustworthiness to every visitor who arrives. A store that looks like a default template — mismatched fonts, generic section layouts, obvious placeholder sections that were never removed — signals the opposite. And in ecommerce, where a customer has no physical store to validate legitimacy and no sales associate to build rapport, visual presentation is one of the primary trust signals available.
The conversion impact of store design is documented and significant. Stores with strong visual identity and consistent branding convert at measurably higher rates than stores with default or inconsistent design. The customer who trusts what they see completes the checkout. The customer who doubts the store's legitimacy abandons it.
Shopify's own data from the Winter 2026 Editions release confirms that merchants who actively use the theme editor's advanced features — custom sections, app blocks, metafield-driven dynamic content — outperform passive theme users on conversion rate by a meaningful margin. The stores that invest time in deliberate customization are the ones that look and perform better — and in 2026, that investment requires design thinking and time, not development skills.
Start Here: Understanding the Shopify Theme Editor
Every customization in this guide happens inside one interface: the Shopify theme editor. Access it by going to Online Store, then Themes, then Customize on your active theme.
The theme editor is a split-screen interface. The left panel contains your customization controls — sections, blocks, settings, and configurations. The right panel shows a live preview that updates in real time as you make changes. Nothing you do in the editor affects your live store until you click Save.
Understanding the three-level hierarchy of the theme editor is essential before making any customization:
Theme settings control global elements — your brand colors, typography, button styles, and spacing — that apply consistently across every page in your store. These are the most impactful customizations because they affect everything simultaneously rather than one page at a time.
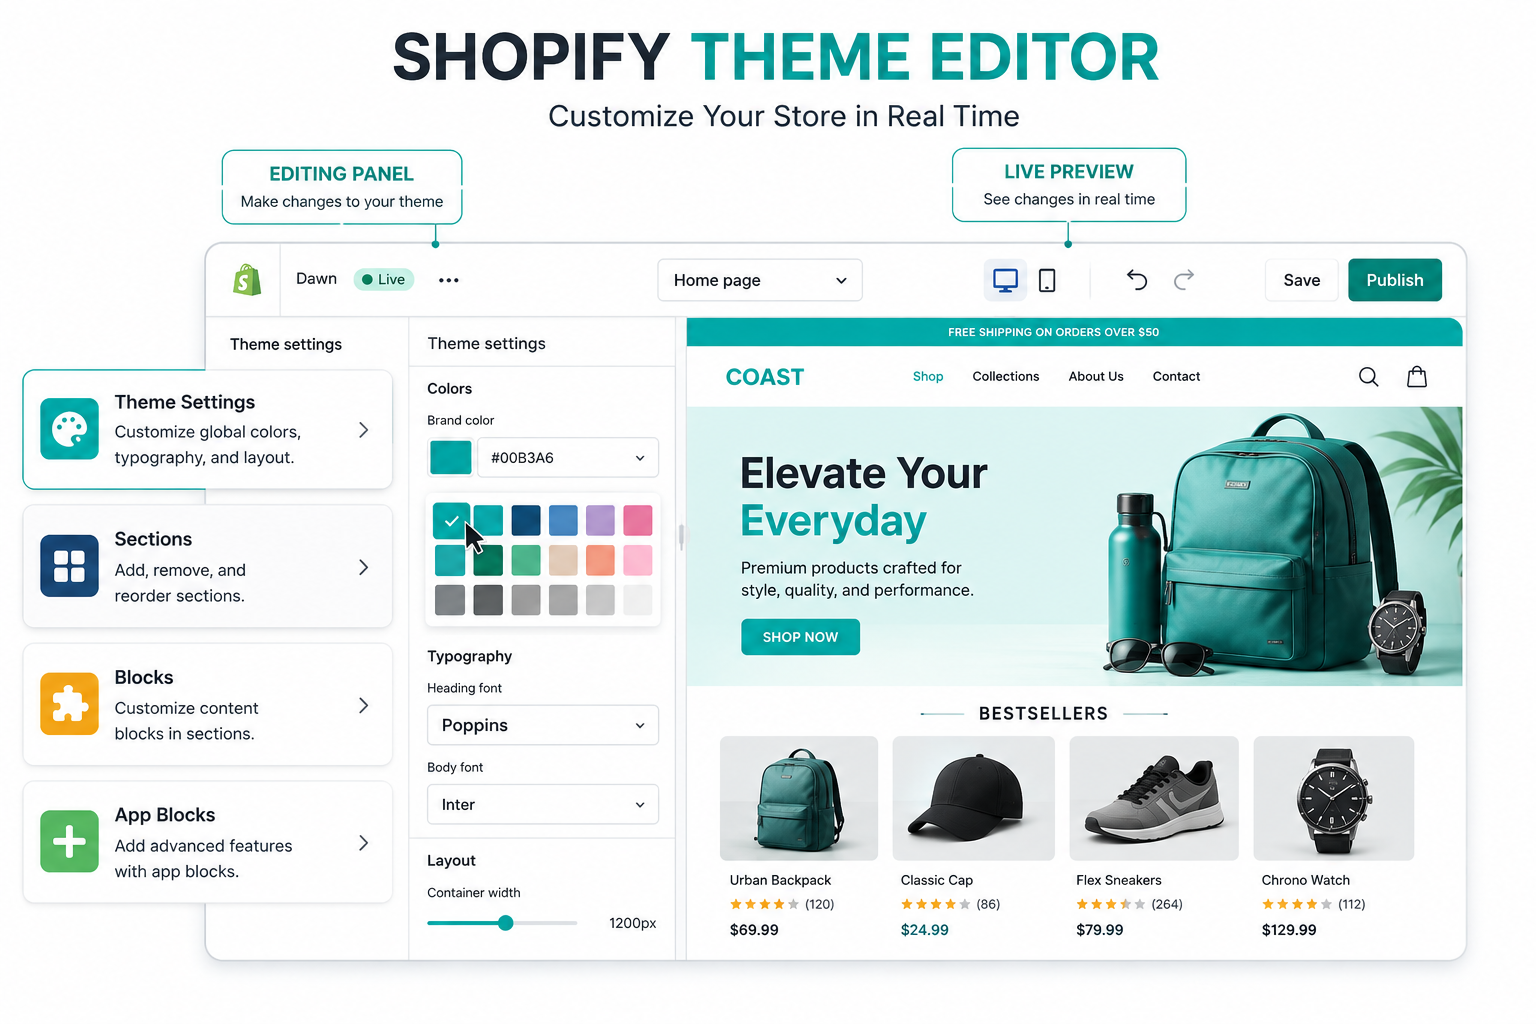
Sections are the modular content blocks that make up each page — image banners, text columns, product grids, testimonial carousels, announcement bars. Sections can be added, removed, reordered, and individually configured on each page through drag-and-drop.
Blocks are the smaller elements within sections — individual text items, buttons, images, or icons that make up the content of each section. Blocks can be added or removed within a section without affecting the section's overall structure.
In 2026, Shopify's Sections Everywhere feature means sections are no longer locked to the homepage — you can add, remove, and rearrange sections on product pages, collection pages, blog posts, and any other page type. This is the foundation of meaningful page-by-page customization without code.
Customization 1: Build Your Brand Color System
Color is the fastest and most impactful visual customization available in the theme editor — and the one most merchants get wrong by choosing colors that look individually attractive but do not work as a system.
A brand color system for Shopify has four roles: a primary color that appears on buttons, links, and key interface elements; an accent color that highlights secondary calls to action and decorative elements; a background color that sets the overall visual tone of the store — typically white, off-white, or a very light neutral; and a text color that ensures readability across all page types.
The mistakes that undermine brand color systems in Shopify themes are using too many colors — more than three to four active colors creates visual noise that reduces brand coherence; choosing colors that look good in isolation but create poor contrast when combined — particularly light text on light backgrounds or dark text on dark buttons that fail accessibility standards; and using colors that do not translate consistently across different screen types, since a rich burgundy that looks sophisticated on a calibrated monitor may appear brown or pink on a phone screen.
In your theme settings, look for Colors under the Branding or Design section. Enter your exact hex codes for each role rather than using the color picker, which introduces slight variations between sessions. Consistency in hex codes across every color application in your theme is what creates the visual coherence that reads as professional.
Customization 2: Typography That Signals Brand Personality
Typography — your choice of fonts and how they are sized and weighted — communicates brand personality before a customer reads a single word. A serif font like Playfair Display signals heritage, quality, and premium positioning. A clean geometric sans-serif like Neue Montreal signals modernity, directness, and simplicity. A humanist sans-serif like Inter signals approachability and clarity.
Shopify's theme editor provides access to Google Fonts, Shopify's own curated type library, and system fonts — giving you hundreds of options without paying for licensed typefaces or uploading font files.
The typography system that works best for most Shopify stores uses two fonts maximum: a display font for headings that carries the brand personality, and a body font optimized for readability at smaller sizes. Mixing more than two fonts creates visual inconsistency that reads as amateur regardless of how attractive the individual fonts are.
In your theme settings, find Typography and set your heading font, body font, and the base font size for both. Then set your font weights — typically bold or semibold for headings, regular for body text. Once set at the theme level, these choices cascade consistently across every page, ensuring that your product page headings, your blog post headings, and your collection page titles all carry the same typographic identity.
The specific customizations worth checking after setting your fonts: headline letter-spacing for all-caps headings, which often needs to be increased slightly to maintain readability at tight spacings; line height for body text, which should be set between 1.5 and 1.7 for optimal readability on screens; and the relative sizing relationship between your H1, H2, and H3 heading levels, which should form a clear visual hierarchy that guides the reader's eye down the page.
Customization 3: Homepage Architecture That Tells Your Brand Story
Most Shopify homepages follow the default section order the theme ships with — hero banner, featured collection, some text, newsletter signup — in an arrangement that feels generic because it is generic. The brands whose stores feel distinctive have thought deliberately about what story they want their homepage to tell and in what sequence.
The homepage architecture that converts best in 2026 follows a narrative logic: who you are and what makes you different is established immediately in the hero section; the products are surfaced next for visitors who are ready to shop; social proof — reviews, press mentions, customer photos — comes next to build trust for visitors who are interested but not yet convinced; a brand values or story section deepens the connection for visitors who are still evaluating; and a final call to action — newsletter signup, loyalty program join, or a curated collection — captures visitors who are not ready to buy today but should not be lost entirely.
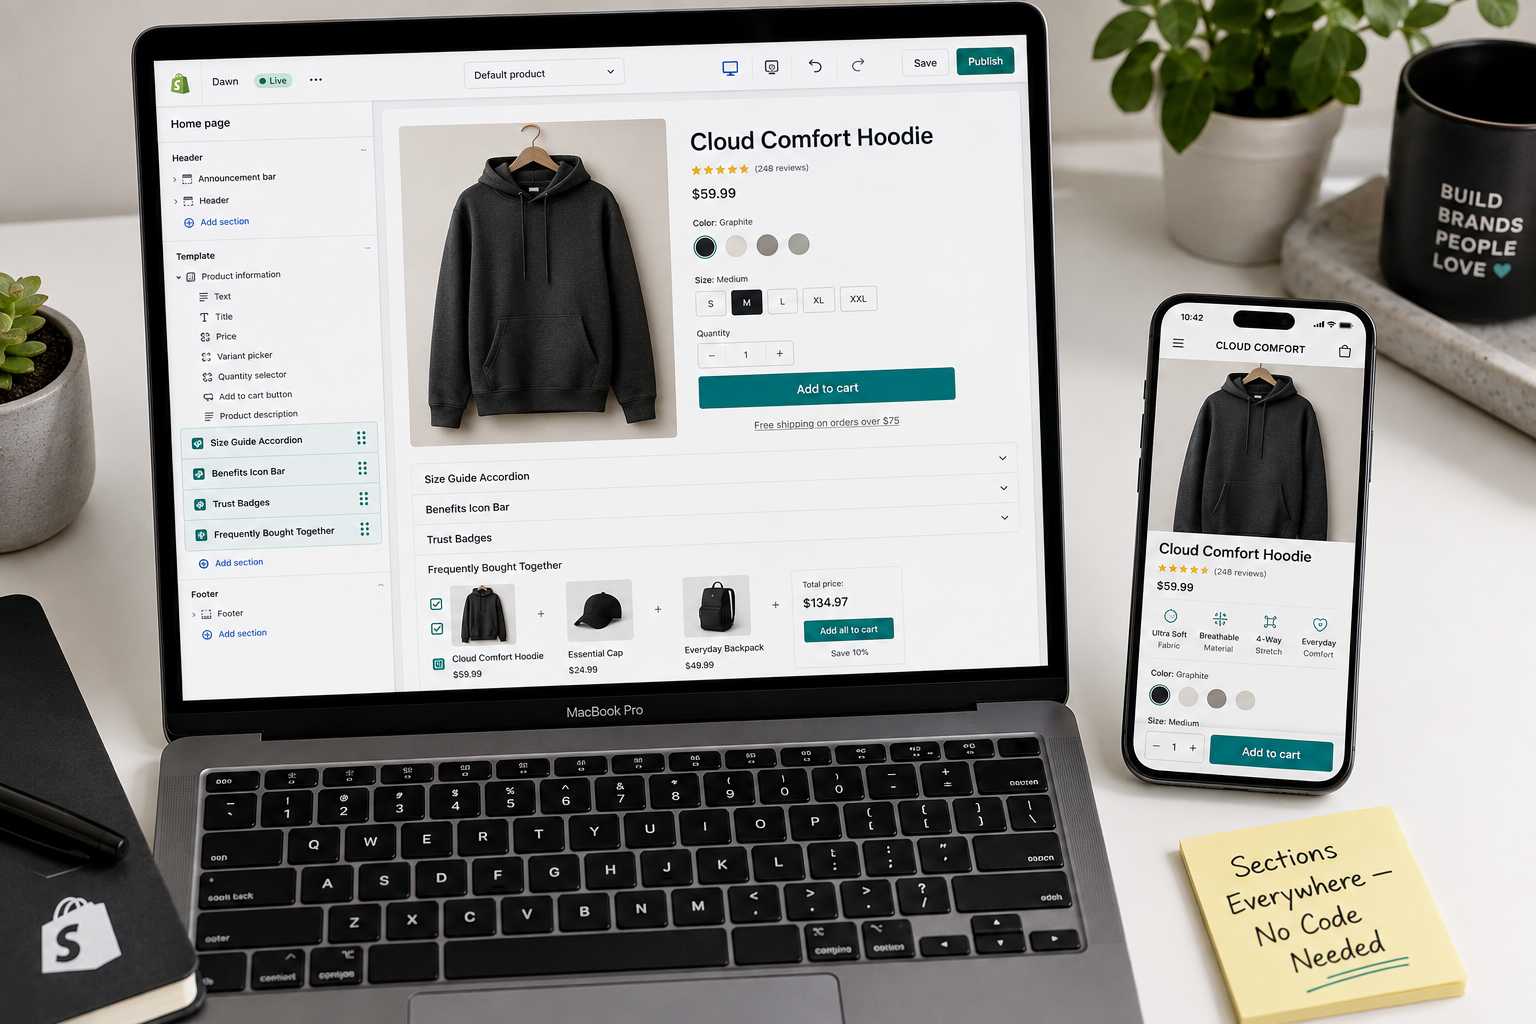
In the Shopify theme editor, you can drag sections into any order on the homepage. Add sections using the Add section button at the bottom of the section list. Remove sections you do not need by selecting them and clicking Remove. Each section has its own settings panel where you can configure content, colors, spacing, and layout.
The specific sections worth adding that most default themes do not include prominently: a press and media logos bar — "As featured in" with publication logos — that establishes credibility within seconds for brands that have received any media coverage; a before-and-after comparison slider for product categories where transformation is the primary selling point; a user-generated content gallery — customer photos in a grid — that provides social proof through real customer imagery rather than brand-controlled photography; and a founder or brand story section that establishes the human identity behind the store.
Customization 4: Product Pages That Convert With Custom Sections
Online Store 2.0 and Sections Everywhere make product pages fully customizable without code for the first time. The default product page layout — image gallery on the left, product details on the right, description below — is the starting point, not the finished state.
The specific section additions that most directly improve product page conversion:
A size guide tab or accordion that opens inline rather than redirecting to a separate page. Customers who can check their size without leaving the product page convert at significantly higher rates than those who navigate away to find sizing information.
A benefits icon bar — three to five icons with short captions highlighting key product benefits — positioned between the price and the Add to Cart button. This communicates the most important selling points in a format that is faster to consume than a paragraph description.
A trust badge row near the Add to Cart button showing your return policy, secure checkout badge, and shipping policy in a visually clean format. These signals reduce purchase hesitation at the highest-intent moment on the page.
A customer review section pulled from your review app — Judge.me, Okendo, or Yotpo — positioned below the product description. Most themes include this if you have a review app installed, but the placement and display settings are worth customizing to show photo reviews prominently rather than burying them in a collapsed section.
A Frequently Bought Together or You May Also Like section below the reviews using Rebuy or a similar recommendation app. This cross-sell placement captures incremental revenue from customers who have already decided to buy and are receptive to complementary recommendations.
Customization 5: The Shopify AI Block Generator
The AI Block Generator, introduced as part of Shopify's Winter 2026 Editions, is one of the most significant no-code customization tools to arrive on the platform and the one most merchants have not yet discovered.
Accessible inside the theme editor's section addition panel, the AI Block Generator allows you to describe a section in plain language and have Shopify generate it for you. Type "Create a testimonial section with four columns, customer photos, star ratings, and a light grey background" and Shopify generates a custom testimonial section matching that description — which you can then edit, style, and populate with real content.
The practical use cases for the AI Block Generator in 2026 are extensive. Custom feature callout sections that highlight your product's unique attributes in a layout that does not exist in your theme's default section library. Comparison tables that show how your product stacks up against alternatives in a formatted grid. Process or how-it-works sections that explain your product in three to four illustrated steps. FAQ sections with accordion expand-and-collapse behavior that fits any page where pre-purchase questions need addressing.
Each generated section is fully editable through the theme editor's standard controls after creation. The AI gives you a starting structure that you refine and populate — saving the time of building complex section layouts from scratch while maintaining full control over the final output.
Customization 6: App Blocks That Extend Your Theme's Capabilities
App blocks are the no-code bridge between Shopify's theme and the third-party tools that extend your store's functionality. When an app supports app blocks — which has become the standard for well-built Shopify apps in 2026 — you can embed its functionality directly into your theme sections through drag-and-drop, without any code injection or theme file editing.
The app blocks worth adding to product pages and the homepage in 2026 are:
A reviews app block — Judge.me, Okendo, or Yotpo — that displays star ratings, review counts, and customer reviews with photos directly on the product page in a format that matches your theme's design rather than appearing as a foreign iframe.
A recently viewed products block that shows each customer the products they have viewed in their current session — a subtle personalization that reduces the effort required to return to a product they were considering.
An urgency or scarcity block from apps including HurryTimer or Scarcity Pro that shows genuine real-time inventory counts and countdown timers for time-limited offers — positioned immediately above or below the Add to Cart button where they have the most conversion impact.
A loyalty points block from Smile.io or Rivo that shows logged-in customers their current points balance and how many more they need for their next reward — a retention signal that increases repeat purchase intent at every product page visit.
An announcement bar from an app like Hextom that can be configured to show different messages based on cart value — "You are $15 away from free shipping" rather than a static generic announcement — dynamically updating as the customer adds items to their cart.
Customization 7: Mobile-Specific Optimizations
Because approximately 74 to 79% of your Shopify traffic arrives on mobile in 2026, every customization decision should be verified on a real mobile device — not just in the theme editor's mobile preview, which approximates but does not perfectly replicate real device rendering.
The mobile-specific customizations that most directly improve conversion:
Padding and spacing adjustments that give content room to breathe on small screens. Default theme spacing is often optimized for desktop and feels cramped on mobile. Increase section padding and reduce the number of elements visible above the fold to give each element more visual impact.
Font size increases for mobile. Body text that is readable at 16px on desktop may feel small on a phone screen held at arm's length. Setting your mobile body font size to 17 or 18px improves readability without affecting desktop appearance.
Column count reductions for mobile. A four-column product grid that looks great on desktop becomes four thumbnail-sized images on mobile. Set your collection pages to two columns on mobile through the collection page layout settings.
Hiding non-essential decorative sections on mobile. Sections that add visual richness on desktop — wide image bands, large whitespace sections, decorative parallax elements — often add scroll distance on mobile without proportional value. Use the visibility settings available in most section configurations to hide desktop-only decorative elements on mobile.
Sticky Add to Cart configuration. Ensure your theme's sticky ATC bar is enabled for mobile and positioned at the bottom of the screen where it is easily reachable with a thumb without obscuring product content.
Customization 8: Custom Page Templates With JSON Templates
JSON templates are the technical foundation of Shopify's Online Store 2.0 architecture — but accessing and using them requires no code knowledge, only an understanding of where to find them.
A JSON template defines which sections appear on a specific page type and in what order. By creating custom page templates, you can have your main product template for your core product range, a second product template for bundle pages with different section arrangements, a third template for featured or bestselling products with additional social proof sections, and custom collection templates for different product categories that display relevant category-specific content.
To create a custom template, go to Online Store, then Themes, then Customize. In the top center dropdown that shows your current page type, select Products or Collections and then click Add template. Name the template, set it up with the sections appropriate for that specific use case, and save. Then assign it to specific products or collections through the product or collection edit page in your admin.
This capability transforms your store from a single-template experience into a fully differentiated set of page experiences — each optimized for the specific products or categories it presents — without writing a line of code.
Customization 9: Metafields for Dynamic Product Content
Metafields are custom data fields that can be added to products, collections, customers, or orders in Shopify — and in 2026, they can be connected directly to theme sections through the visual theme editor without code.
The practical use case: you want to display different product-specific information on different product pages — an ingredients list for skincare products, a compatibility note for electronics, a care instruction table for apparel. Without metafields, you would either put all of this in the description field (making it unstructured and hard to format) or build separate product templates for each type (which multiplies maintenance work).
With metafields, you create a custom field at the product level — an ingredients metafield, for example — enter the relevant data for each product in the product editor, and then connect that metafield to a theme section block through the Dynamic sources option in the theme editor. The section displays whatever content is in that product's metafield, automatically different for every product that has the field populated.
Setting up metafields takes approximately 20 minutes the first time — going to Settings, then Custom Data, then Products, and adding your fields — and transforms your ability to display structured, product-specific information in a consistent, well-formatted design without any code and without putting all of your content in one undifferentiated description block.
Customization 10: Always Duplicate Before You Customize
This is the one operational practice that protects every customization decision you make — and the one that most merchants skip until they experience a customization that breaks something they cannot easily reverse.
Before making any significant theme customization, duplicate your current theme. Go to Online Store, then Themes, find your active theme, click the three-dot menu, and select Duplicate. This creates an exact copy of your theme in its current state that remains untouched while you experiment on the active theme.
If a customization produces a result you do not want, or if a theme update introduces a conflict with changes you have made, the duplicated theme provides a known-good restore point that takes seconds to reactivate. Without it, undoing unwanted changes requires manually reversing every edit you made — often impractical once multiple sessions of changes have accumulated.
Professional Shopify developers duplicate themes before every significant customization session. The practice costs nothing and provides unlimited recovery capability. Make it automatic.
What Still Requires a Developer in 2026
Honest guidance on theme customization requires acknowledging where no-code tools reach their limits — not to discourage merchants from maximizing what the theme editor offers, but to set realistic expectations for the specific situations where developer help genuinely delivers value.
Completely custom section layouts that are not achievable through existing section configurations or the AI Block Generator. When a specific design pattern you want does not exist in any available section or app block, custom Liquid section development is the path.
Advanced conditional logic that shows different content to different customer types — displaying VIP pricing to tagged customers, showing different homepage sections to first-time versus returning visitors, or rendering different product page content based on customer purchase history. These dynamic behaviors require custom Liquid code or app integrations that go beyond theme editor capabilities.
Complex product configurators — live preview tools, custom engraving inputs, bundle builders with real-time pricing calculations — that require custom JavaScript and data handling beyond what standard app blocks provide.
Custom checkout page design for non-Plus merchants. Shopify's checkout page is locked from theme editor customization for standard plan merchants. Visual checkout customization requires Shopify Plus and Checkout Extensibility.
For everything outside these specific cases, the no-code toolkit available in 2026 covers the vast majority of what makes a Shopify store distinctive, trustworthy, and conversion-optimized — without spending a dollar on development.
Final Thoughts
The gap between a default Shopify theme and a store that feels genuinely branded and distinctive is not the gap between a merchant who can code and one who cannot. It is the gap between a merchant who stops at installation and one who spends deliberate time in the theme editor making intentional design decisions.
Your color system communicates brand personality before a customer reads anything. Your typography signals whether your brand is premium or approachable, modern or traditional. Your homepage section architecture tells a story or fails to. Your product page structure either answers the questions that precede purchase or leaves them unanswered. Each of these decisions is available to every Shopify merchant through the visual theme editor — no development skills required.
The stores that look like they were designed by an agency are often stores where the merchant simply spent an afternoon learning the theme editor, applied a coherent color system and typography choice, rearranged their homepage sections into a logical narrative sequence, and added a handful of well-chosen app blocks to their product pages.
That afternoon is available to you right now. And the revenue impact of what it produces compounds with every visitor who arrives at a store that looks like it was built for them.
Need help designing or customizing your Shopify theme for maximum brand impact and conversion performance? Get in touch with EcomFixify — we specialize in Shopify development and store design for brands that want to look distinctive and convert effectively.